Introduction to Kafka @ ALT.NET
On Tuesday night I gave a presentation on Apache Kafka at the Sydney ALT.NET meet up.
What is Kafka?
Kafka is publish-subscribe messaging rethought as a distributed commit log. Originally developed at LinkedIn in 2011 it has been adopted by some big companies since such as Twitter, Netflix and Microsoft to provide high throughput, low latency messaging.
Most common use cases for Kafka include:
- Pub/Sub
- Activity tracking
- Metrics
- Log aggregation
- Stream processing
- Event sourcing
- Commit logs
How do I use it?
There are a bunch of libraries available for a lot of languages. Unfortunately the .NET ones are quite immature. Recently a few of the boffins at Microsoft open-sourced the library they’ve used internally called CSharpClient-for-Kafka. This library is targeted at version 0.8, but should soon support 0.9. It is fast and with some work will be quite reliable.
However, it does not support the new consumer protocol that was released with v0.9. If you want something that does, you’ll have to go for ah-/RDKafka-DotNet. This is a wrapper around the librdkafka c library that’s the most commonly used outside of Java-land. The downside of this is that due to interop it’s not quite as performant as the native .NET TCP communication of the MS library. In my tests I’ve found publishing with CSharpClient-for-Kafka to be ~.1ms per message/batch and consuming ~20ms. RDKafka-DotNet performs these at ~2ms and ~150ms with similar parameters.
Also, if you think that TCP is too hard core, you can give the Confluent REST Proxy or Kafka Pixy a go… These are services that allow you to publish to and subscribe from Kafka via HTTP APIs. Not the most performant option, but definitely easier to debug…
If you’re looking for samples of using these clients you can check out a couple of my repositories –
- kafka-basic – a wrapper for CSharpClient-for-Kafka that provides simple producer/consumer abstractions
- rdkafka-tests – a test console for RDKafka-DotNet
Where do I learn more?
The Apache Kafka site has a lot of great information to get you up and running. Confluent are the commercial entity providing supported distributions and whose founders were originally responsible for the development of Kafka at LinkedIn.
My presentation is available from Tuesday night on slideshare with a few funky animations to help visualise message delivery and rebalances.
Saying goodbye to Readify
After 8 years at Readify I’ve decided to hang up my consulting hat. Over the course of the next two weeks I’m finalising my hand over and a few fun tasks before, well, riding off into the sunset.
At our quarterly company info night the other evening I had the chance to formally say goodbye. In my time here the company has grown from 40 people to over 200 and seen such a phenomenal change in the size and number of simultaneous projects we’re taking on. We continue to win awards and more importantly the respect of our customers all the time.
It’s really been a privilege and an honour to be part of such a fantastic group of people, many of whom I know will remain friends for a long time. I have grown so much and owe a lot of it to the inspiring and challenging environment that Readify creates.
As for what I’m doing next… Well, that’s undecided. I’m looking for an opportunity to really test myself and grow further. I have no doubt I’ll find something that pique’s my interest soon, but if that takes a while and I end up repainting and laying some floors in my apartment or spending a little time at the snow with the kids then I won’t be disappointed.
The easy way to push packages into HockeyApp from CI
As I mentioned in my last post, we use HockeyApp to distribute one of our internal mobile applications. As a platform, it provides many wonderful features including distribution, crash reports, feedback forms, analytics and team management. It’s also been acquired by Microsoft recently, which I’m sure will mean a lot of interesting things coming in the Windows 10 timeframe…
Our build and release pipeline is completely automated – just like they all should be! We have a very simple branching strategy (as we only ever have a couple of people working on it). We use pull requests to manage feature branches and anything that hits the master branch goes live. HockeyApp has a REST API that allows you to upload new versions quite easily.
We went through a couple of iterations before this process became easy though. At first we tried pushing packages using PowerShell. This didn’t work too well… unfortunately the API uses multiple form fields to accept the parameters and PowerShell’s built-in web commands aren’t the easiest to accomplish this with. So we wrote a C# console app to do it. This worked, but was a little nasty because we actually needed to compile and include it as an artefact for a later build to use.
We revisited this later and thought that if we are going to push all the packages into artefacts then we could just use curl from a Mac (or Linux) build agent. This made it really easy! We could now use three simple shell commands to push the packages to hockey app –
1. iOS
curl \

-F "status=2" \

-F "notify=1" \

-F "ipa=@dist/MyApp-%CiBuildNumber%.ipa" \

-H "X-HockeyAppToken: %HockeyAppToken%" \

https://rink.hockeyapp.net/api/2/apps/%iOSAppId%/app_versions/upload
2. Android
curl \

-F "status=2" \

-F "notify=1" \

-F "ipa=@dist/com.mycompany.myapp-signed.apk" \

-H "X-HockeyAppToken: %HockeyAppToken%" \

https://rink.hockeyapp.net/api/2/apps/%AndroidAppId%/app_versions/upload
3. Windows Phone
curl \

-F "status=2" \

-F "notify=1" \

-F "ipa=@dist/MyApp.WP_Release_ARM.xap" \

-H "X-HockeyAppToken: %HockeyAppToken%" \

https://rink.hockeyapp.net/api/2/apps/%WPAppId%/app_versions/upload
They’re all the same right…? Yep – that’s the point. The only thing you need to remember is that the application IDs need to be the right one for your platform and you need to ensure you have the right package names.
The commands above have been parameterised so that you can store the application IDs and HockeyApp token as TeamCity parameters. This would be really handy if you wanted to say have multiple release channels (alpha/beta/RTW) by using a build template and setting the parameters on each configuration.
You may also notice the CiBuildNumber parameter in the iOS command. As this is a chained build we can pick up the Continuous Integration build’s number (which we’ve set up to be a version number – e.g. 1.3.7.0) and add it as a configuration parameter so that we can easily reference it in scripts.
And that’s it!
What to consider when doing Continuous Integration on a Xamarin app
OK, let me set the scene… It was a dark starry night at the local watering hole (READ: pub) and I was discussing one of our internal systems. We quickly identified that:
- none of us liked using the website on our phone
- we had an almost equal split between iOS, Android and Windows Phone users
- and several people wanted to learn Xamarin
So we did the only logical thing… spun up a very small team to build an app. While I could regale you with stories of building APIs and authenticating with Azure AD – I’ll leave that for another day and describe one of our larger challenges: building and packaging the app.
Aaron Powell has actually already written a blog post about how we handled versioning. This post will describe some of the challenges and considerations for process of building the app from source control and packaging it.
Considerations and Challenges
0 – A Build System
First off, let’s address the elephant in the room… We used TeamCity.
In the beginning, we weren’t really sure how much to structure our builds, whether we’d target Mac or Windows, etc. So we chose the most flexible system that we knew. As a consultant, I spend a lot of time answering questions with “it depends…” and that definitely is the answer when asked what build system to use.
So to those who ask why TeamCity over TFS/Jenkins/Bamboo/etc. My simply answer is –
- it can target OS X and Windows
- it’s flexible enough to incorporate more steps if needed and split out load over multiple chained configurations if needed; and
- I’ve used it a LOT so I’m comfortable with it.
1 – Target OS for Build Agents
Those who have used Xamarin will admit that it’s an easier setup when you can do everything on a Mac. However, we didn’t quite have that luxury. Our deciding factor here was simple – we need to compile a Windows Phone app. While we *could* (and actually did…) build for iOS on Mac and WP on Windows (either for Android), this would lead to several chained build configurations and as anyone in a couple-week skunkworks project would tell you –

So instead we chose to run our builds on a Windows VM that would utilise the Xamarin Build Host on its Mac host to build the iOS app.
2 – Distributing your app
Choosing decision is based on what channels you’ll use to distribute your app. In our case, we:
- Needed to push it out to all employees
- Didn’t want it on any stores
- Didn’t want to have to manage users’ device IDs
So we chose Enterprise provisioning for iOS and Windows Phone and a generated keystore for Android. This means we can use something like HockeyApp for distribution. This method of provisioning would also work well for distributing apps to testers before they are published to a store.
If you’re pushing your apps straight into a store then you’ll need to follow the guidelines for each platform’s provisioning.
iOS Provisioning
Using an Enterprise Provisioning Profile means we can freely distribute our app through the organisation without the need for maintaining UUIDs (as with Ad-Hoc). When packaging your iOS app you can either –
- Sign into XCode as a user with access to the provisioning profile
- Install the certificate and provisioning profile manually
Check out Xamarin’s docs for a step-by-step guide on doing this.
Android Provisioning
If you don’t want to go via Google Play or Amazon Stores to get a signing key, you can generate your own keystore using –
keytool -genkey -v -keystore release.keystore
Store this in a safe place.
Windows Phone Provisioning
If you’re building a marketplace app, you can get your certificate by associating the project with the store app. This makes things very easy…
Using an Enterprise distribution profile meant we needed to distribute an AETX to our users in order to trust applications signed for our enterprise. We then need to sign the XAP (or APPX) file that is produced as a post build step. The trick here is to ensure that the manifests have the right author and publisher details in them.
XAP projects have a WMAppManifest.xml file in the Properties folder. In this file the App element should have the Author and Publisher attributes set to the CN of your certificate.
APPX projects have a Package.appxmanifest in their root. The Identity element’s Publisher attribute needs to match the certificate’s distinguished name and the Properties/PublisherDisplayName element should have the certificate’s CN as its value.
3 – Solution Build Configurations
They’re important. Follow the guides on the Xamarin docs for preparing iOS and Android for distribution carefully. They’re full of golden nuggets and are sure to get you through some tough times.
4 – Restoring Xamarin Components
Xamarin Components are fantastic! They’re just like commercialised NuGet packages.
However, getting them to work just like NuGet packages is a little bit tricky. There’s a command line tool available on https://components.xamarin.com/submit (direct download) that is used to package or restore components in a solution. To use this tool you need to authenticate with it. When you do, it drops a cookie called .xamarin-credentials in your home directory (~). It then uses that cookie for subsequent operations.
There are a couple of ways around this:
-
Store your cookie in source control and –
- Copy the cookie to the home directory before restoring components
- Add an environment variable pointing the COOKIE_JAR_PATH to your build process
- Run the command manually on the machine
We chose the source control + environment variable option because it seemed a little neater than littering my home directory. Looking back, there’s so much manual set up in any agent that I’m going to suggest running it manually on the agent.
Hindsight
We actually had a couple of iterations of build configuration. We started with a highly parallelised set of builds chained up the wazoo… and simplified it down to 2. The first compiled and packaged the applications and published them as artefacts on all branches. The second, which only ran for changesets on the master branch, grabbed the artefacts from the previous build and published them to HockeyApp.
Windows Phone signing also proved to be very difficult with the Enterprise profile. We originally used this because we didn’t want to be spinning up shadow accounts for each platform to get certificates, but signing and distributing a XAP/APPX manually is quite convoluted and tricky.
We learnt a lot from this project about Xamarin. By the end we had spent more time on infrastructure pieces (i.e. exposing APIs, build configurations, integrating third party components, etc) than actually putting the core functionality in. It was great fun and I wouldn’t change it for the world!
A Raspberry Pi Build Light for TeamCity in Mono
Some Background…
After I bought my Raspberry Pi I went through a little period of uncertainty that most other owners have, asking myself “how do I make this thing useful?” It didn’t take long before one of my colleagues created a GitHub repository for a little project that had been sitting around for a while – TeamFlash.
TeamFlash is a build light client app for TeamCity. It monitors the build server to find the status of the latest build and flashes a light in a different colour depending on that status. Having a little bit of electronics know-how, I wanted to see if I could make my Raspberry Pi into a standalone build light.
First up, I knew there had to be someone that’s interfaced with the GPIO ports. Within a few seconds of deciding to search I stumbled upon the RPi Low-level peripherals page. This has a sample of driving the GPIO using C# linking to the RaspberryPi.Net GitHub repository. It has one moving part – Mike McCauley’s BCM2835 library. Brilliant! Now to get it working…
Getting Started
The RapsberryPi.Net README has instructions on how to compile the BCM2835 library into a statically linked library named libbcm2835.so. To use GPIO from Mono I simply:
- Compiled the BCM2835 library
- Compiled the RaspberryPi.Net project
- Took the output of both and added them to my Dependencies folder
- Added RaspberryPi.Net.dll to my project as a reference
- Added libbcm2835.so to my project as a linked file and changed its build action to Copy if newer
Now I can write code like:
var led = new GPIOMem(GPIO.GPIOPins.GPIO01);
led.Write(true);
Thread.Sleep(1000);
led.Write(false);
Running TeamFlash on YOUR Pi
Here’s how you can get TeamFlash working on your Raspberry Pi.
Step 1 – Wiring it up
I’ve got some standard LEDs from an old Arduino kit, so I’ve hooked each of those in serial with a 330 Ohm resistor to ensure the forward current is within the correct range.


Step 2 – Boot Raspbian
Go to http://www.raspberrypi.org/downloads and get the latest release of Raspbian. Follow the instructions and get it up and running.
Step 3 – Install the Required Components
To get it all going you’ll need to install mono. If you want to build it on the Pi, install git and mono-complete:
sudo apt-get install git
sudo apt-get install mono-complete
Otherwise the mono-runtime will suffice:
sudo apt-get install mono-runtime
Step 4 – Get TeamFlash
Again, if you want to compile the app on the Pi:
git clone https://github.com/ducas/TeamFlash.git
cd TeamFlash
xbuild
Otherwise you can clone the repository and compile it on your desktop/laptop and just move the output (contents of TeamFlash/bin/Debug) around on a USB key.
Step 6 – Configure TeamFlash
Edit the serverUrl, username and password values in TeamFlash.exe.config (in the output directory of the build – TeamFlash/bin/Debug). If you’re looking for an easy way to do this on the Pi, try using nano:
nano TeamFlash.exe.config
When using nano, simply change the appropriate values and hit Ctrl + X to exit – you will be prompted to save.
Step 7 – Run TeamFlash
sudo mono TeamFlash.exe
Step 8 – Profit!
And that’s it! When your build is:
- Good – the green light will stay lit
- Broken – the red light will flash on and off
- Investigating – the red and yellow lights will flash sequentially
Unit Testing and the .NET Micro Framework
Recently I decided to take up a new hobby… writing code for small things. So, being a .NET developer, I decided the easiest way to crack this nut is to use .NET Micro Framework (or NETMF).
Getting started with NETMF is fairly easy for a .NET developer. You go to www.netmf.com, download and install the SDK and you create new projects using the new templates.
One thing that’s missing from NETMF is the ability to unit test your projects. Because the core is not the same as the desktop core there are no unit testing tools. Searching a bit I found a few people using some patchy solutions involving referencing code files in regular unit testing projects. While this may work for some, I don’t believe it’s the most accurate test as the framework implementations are rather different. This drew me to creating my own solution…
Introducing MFUnit!
MFUnit is a simple .NET Micro Framework Unit Testing Library. It uses convention based discovery to find and run your tests.
Open Source
MFUnit is open source – https://github.com/ducas/MFUnit. Check it out! You’ll find a readme page with more detailed information and source code, including a test project that uses MFUnit to test the Assert class.
Installation
1. Create a NETMF Console Project
2. …

3. Profit!
Installing this package will create a class named TestProgram. Simply delete Program.cs, write your tests and you’re on your way.
Conventions
- Test fixtures/classes must end with Tests
- Test methods (or facts) must be public void methods
Asserting
MFUnit comes with an Assert library that supports the following methods:
- Fail
- AreEqual
- IsTrue
- IsFalse
- IsNull
- IsNotNull
- Throws
Example
The following class will be discovered by the test runner and the methods will be executed.
public class AssertTests
{
    public void AssertIsNull_ShouldPass_WhenActualIsNull()
    {
        Assert.IsNull(null);
    }

    public void AssertIsNull_ShouldFail_WhenActualIsNotNull()
    {
        Assert.IsNull(1);
    }
}
The first method will pass, but the second will fail. The Output Debug window will contain the following text:
PASS AssertTests.AssertIsNull_ShouldFail_WhenActualIsNull
    #### Exception MFUnit.AssertException - 0x00000000 (3) ####
    #### Message: Expected: "null", Actual: "not null".
    #### MFUnit.Assert::Fail [IP: 0005] ####
    #### MFUnit.Assert::IsNull [IP: 000f] ####
    #### MFUnit.Tests.AssertTests::AssertIsNull_ShouldPass_WhenActualIsNull [IP: 0008] ####
    #### System.Reflection.MethodBase::Invoke [IP: 0000] ####
    #### MFUnit.TestRun::Execute [IP: 00b6] ####
A first chance exception of type 'MFUnit.AssertException' occurred in MFUnit.dll
FAIL AssertTests.AssertIsNull_ShouldPass_WhenActualIsNotNull: Expected: "null", Actual: "not null".
GUI
Currently the only GUI is a simple Pass/Fail count.

Depending on whether this picks up and how many people request it, I may put some effort into listing the appropriate tests and making the information navigable.
Also, once VS11 is a bit closer to release, I may add a plugin for the test runner.
Enjoy!
Hopefully this is useful to others out there. If you have any suggestions feel free to leave comments. If you want to contribute I’ll happily accept GOOD pull requests.
Using Web API Validation with jQuery Validate
Building on my last post about validating your model with Web API, if you’re calling a Web API controller from JavaScript you may need to parse the validation result and display it on the screen.
Most people using MVC would be using the jQuery Validate plugin that’s been included with the default template for quite a while now. While most validations are performed using JavaScript adapters, some are only performed server side. As a result, the regular unobtrusive JavaScript adapters will not catch this before the post occurs. This means that you if you are using JavaScript requests with Web API to handle data manipulation you will need to somehow manually handle the validation errors that will be returned.
Plugging into jQuery Validation is actually quite easy… To validate a form, simply select the form using jQuery and call .validate() on it – e.g.
var validator = $('.main-content form').validate();
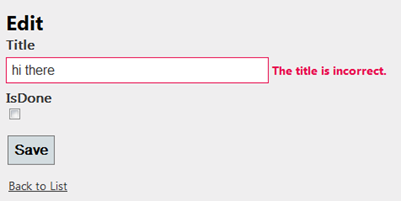
This will return a validator object will a few handy methods on it. Two of which are valid() and showErrors(). The valid method will return a Boolean value indicating whether the form is valid or not and the showErrors method will show any validation errors on the current form. The showErrors method also accepts an object that defines any additional error messages you wish to display – e.g. to display the message “The title is incorrect” for a property named Title:
validator.showErrors({ Title: 'The title is incorrect.' });
Now, assuming I a view with the following mark-up inside the form, I should see a validation error:
<div class="editor-label">@Html.LabelFor(model => model.Title)</div>
<div class="editor-field">
    @Html.TextBoxFor(model => model.Title)
    @Html.ValidationMessageFor(model => model.Title)
</div>
But how do we connect this to Web API…? Well, if you’ve read my previous post you’ll recall that calling a Web API controller’s PUT action that’s decorated with the ValidateFilter attribute I created will return a collection of validation errors if the model is not valid. To test this, I’ll modify my TodoApiController from the previous post as follows:
[ValidateFilter]
public void Put(int id, TodoItem value)
{
    if (value.Title == "hi there")
        ModelState.AddModelError("Title", "The title is incorrect.");

    if (!ModelState.IsValid) return;

    db.Entry(value).State = EntityState.Modified;
    db.SaveChanges();
}
I should now receive a validation error whenever I try to update an item with the title “hi there”. Let’s write some jQuery to submit my form:
function updateItem(form, url) {
    var validator = form.validate(),
        serialized = form.serializeArray()
        data = { };

    if (!validator.valid()) { return; }

    // turn the array of form properties into a regular JavaScript object
    for (var i = 0; i < serialized.length; i++) {
        data[serialized[i].name] = serialized[i].value;
    }

    $.ajax({
        type: 'PUT', // Update Action
        url: url, // API Url e.g. http://localhost:9999/api/TodoApi/1
        data: data, // e.g. { TodoItemId: 1, Title: 'hi there', IsDone: false }
        dataType: 'JSON',
        success: function () { alert('success'); },
        error: function (jqXhr) { extractErrors(jqXhr, validator); }
    });

}
Now let’s look at extractErrors:
function extractErrors(jqXhr, validator) {

    var data = JSON.parse(jqXhr.responseText), // parse the response into a JavaScript object
        errors = { };

    for (var i = 0; i < data.length; i++) { // add each error to the errors object
        errors[data[i].key] = data[i].value;
    }

    validator.showErrors(errors); // show the errors using the validator object
}
Lastly, attaching to the form’s submit event will call this whenever the Enter key is hit or the Submit button is clicked:
$('.main-content form').submit(function () {
    updateItem($(this), '/api/TodoApi/' + $('#TodoItemId').val());
});
Validating your model with Web API
One of the great things about ASP.NET 4.5’s Web API is that it’s built on the same (or similar) principles as MVC. This means that you get a lot of cool things out of your API controllers from MVC – like Action Filters.
While building my first Web API controller, I wanted to ensure that a creation or an update of an item was only done if that item was valid. I also wanted to pass any validation errors back to the client. This looks quite difficult at first because the Put and Post functions on an ApiController can’t return a result. Action Filters to the rescue!
With a simple action filter attribute, you can ensure that your models are validated and the errors are returned in a simple format to the client by decorating the appropriate methods.
Note: Code also available on Gist – https://gist.github.com/1920999
public class ValidateFilterAttribute : ActionFilterAttribute
{
    public override void OnActionExecuted(HttpActionExecutedContext actionExecutedContext)
    {
        var modelState = actionExecutedContext.ActionContext.ModelState;
        if (!modelState.IsValid)
        {
            var errors = modelState
                .Where(s => s.Value.Errors.Count > 0)
                .Select(s => new KeyValuePair<string, string>(s.Key, s.Value.Errors.First().ErrorMessage))
                .ToArray();

            actionExecutedContext.Result = new HttpResponseMessage<KeyValuePair<string, string>[]>(
                errors,
                HttpStatusCode.BadRequest
            );
        }
    base.OnActionExecuted(actionExecutedContext);
}
Now, for the controller implementation…
public class TodoApiController : ApiController
{
    private BetterMobileSpaContext db = new BetterMobileSpaContext();

    // GET /api/todoapi
    public IEnumerable<TodoItem> Get()
    {
        return db.TodoItems.ToList();
    }

    // GET /api/todoapi/5
    public TodoItem Get(int id)
    {
        return db.TodoItems.Find(id);
    }

    // POST /api/todoapi
    [ValidateFilter]
    public void Post(TodoItem value)
    {
        if (!ModelState.IsValid) return;

        db.TodoItems.Add(value);
        db.SaveChanges();
    }

    // PUT /api/todoapi/5
    [ValidateFilter]
    public void Put(int id, TodoItem value)
    {
        if (!ModelState.IsValid) return;

        db.Entry(value).State = EntityState.Modified;
        db.SaveChanges();
    }

    // DELETE /api/todoapi/5
    public void Delete(int id)
    {
        TodoItem todoitem = db.TodoItems.Find(id);
        db.TodoItems.Remove(todoitem);
        db.SaveChanges();
    }

    protected override void Dispose(bool disposing)
    {
        db.Dispose();
        base.Dispose(disposing);
    }
}
Now a Create (PUT) and an Update (POST) request will validate the model before invoking the appropriate action. Calling Create from using a JSON request with an invalid model would look something like this:
Request
Method: PUT
Body: { Title: ”, IsDone: false }
Response
Status Code: 400 (Bad Request)
Body: [{ “key”: “Title”, “value”: “The Title field is required” }]
Using a valid model will simply result in a 200 (OK) response with no body.
NOTE: while writing this post I stumbled on these two blog posts that did the same thing and adapted my code:
- http://weblogs.asp.net/cibrax/archive/2012/02/23/validating-your-models-in-asp-net-web-api.aspx
- http://blog.alexonasp.net/post/2012/02/16/ASPNET-MVC-4-public-beta-including-ASPNET-Web-API.aspx
EDIT 2012-02-27: Updated code to replace ValidationError type with KeyValuePair and changed filter to be after action execution so controller can perform any extra validation.
Project Liike (aka. Microsoft Patterns & Practices do Mobile Web)
Microsoft have started a new Patterns & Practices project name Liike (LEEE-keh) with the aim of delivering guidance for building mobile web solutions.
How do they plan to do this…?
Well they’ve got a few FTE’s who are creating a mobile version of a previous project as a reference implementation so they can make the mistakes we’ve all made in the past. They’ve also taken on an advisory board consisting of a few members of the community (including myself) for some ideas and extra guidance.
One thing that’s been made clear so far is that reusable code is not a major deliverable. There are many people out there who’ve done a bang-up job of building UI frameworks and plugins for mobile web, so they don’t want to re-invent the wheel – they just want to reduce the squeak in yours by giving you the oil you need to run smoothly.
So, how can you help…?
1. There’s a uservoice site available for you to throw your ideas for what you think are the most important challenges: http://liike.uservoice.com/forums/136038-mobile-web-dev-guidance
2. Start a conversation with myself or anyone else on the advisory board! I’m always available on twitter and am happy to take comments on my blog. If you want to get me on email, just leave a comment on this post and I’ll get back to you.
Using the System Tray to show progress in Windows Phone 7 Mango
Before Mango it was a little difficult to put a generic status message at the top of your page. The Mango tools have made this a bit easier by giving developers (more) access to the System Tray. That’s this part:
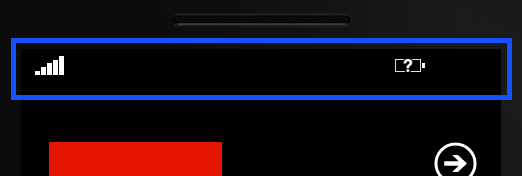
You are still a bit limited in what you can do (i.e. you can’t actually add or remove icons), but there’s a lot more flexibility than before.
You can access the system tray either in code or XAML using the Microsoft.Shell.SystemTray class. This class has the following dependency properties:
- IsVisible
- Opacity
- BackgroundColor
- ForegroundColor
- ProgressIndicator
While it’s quite exciting to be able to style the status bar, I cried out of joy when I saw the ProgressIndicator property. Why…? Because now I can add progress information to the top of my pages quickly and easily! J
So, I want to add a downloading message and progress bar to the top of my page (above the application title) as follows:

Using XAML, I can add text and a progress bar to a page by dropping the following into the page:
<shell:SystemTray.ProgressIndicator>
    <shell:ProgressIndicator IsIndeterminate="true" IsVisible="True" Text="Click me..." />
</shell:SystemTray.ProgressIndicator>
Or, using code, I can accomplish the same thing by dropping this into my code:
ProgressIndicator progress = new ProgressIndicator
{
    IsVisible = true,
    IsIndeterminate = true,
    Text = "Downloading details..."
};
SystemTray.SetProgressIndicator(this, progress);
Feel free to download my sample application showing how to manipulate the System Tray:
![]()

